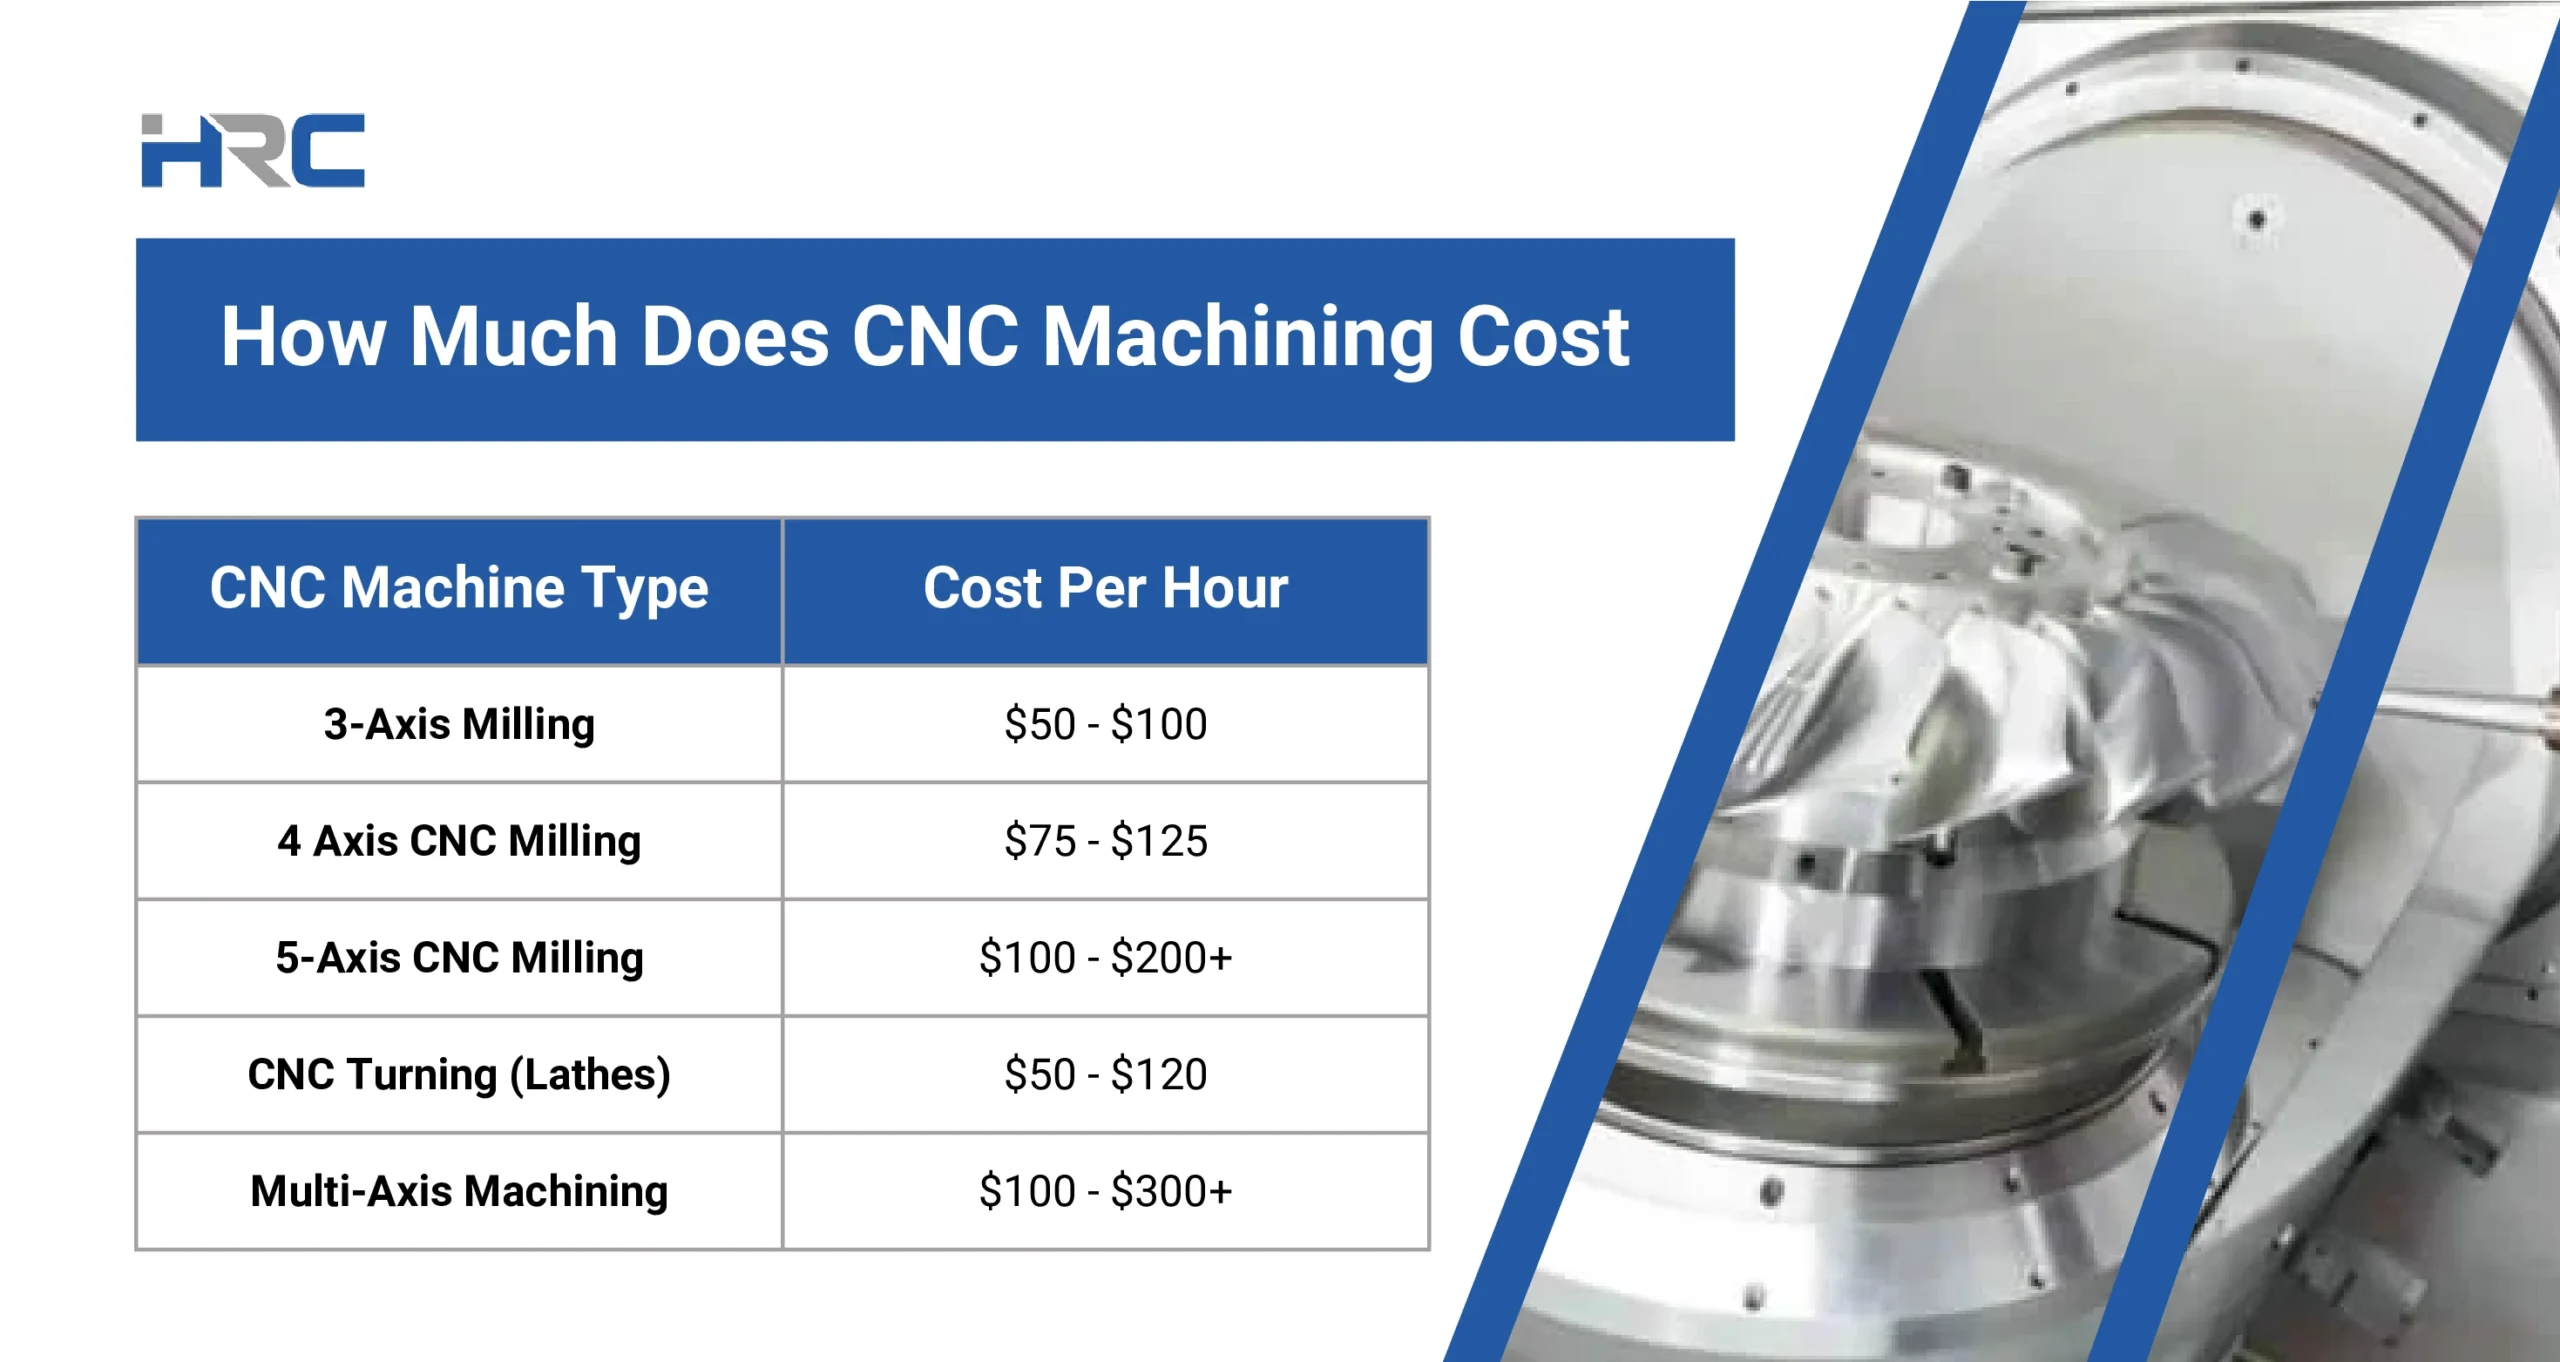
Skip to content
 TIG welding, also known as Gas Tungsten Arc Welding (GTAW), is one of the most precise and clean methods for joining metals. It’s especially effective for aluminum welding with TIG, producing durable, clean, and visually appealing results. When done correctly, TIG-welded aluminum exhibits a bright, smooth finish with a distinct “stacked coin” appearance. Unlike MIG or stick welding, TIG welding aluminum requires precise control of heat, polarity, and filler materials to ensure strong, defect-free joints.
Preparation
Before starting TIG welding for aluminium, preparation is crucial. Clean the aluminum surface thoroughly using a stainless-steel brush or suitable cleaner to remove oil, paint, or oxide layers. Even a thin oxide film can prevent proper fusion.
Choose the right tungsten electrode—2% ceriated or 2% lanthanated tungsten works best for alu TIG welding. Use pure argon gas as shielding gas, or a helium–argon mix for thicker sections. Finally, check all your torch components and cables for tight, clean connections.
Set Up Your Tig Welder
- Current type: AC (alternating current) is non-negotiable for tig welding aluminum. It has a “cleaning action” (from the electrode-positive cycle) to break up oxide, plus melts metal (electrode-negative cycle)—critical for aluminium welding with tig.
- Amperage: Adjust based on thickness. For 1/8-inch aluminum, start at 100–150 amps; for thicker material (1/4-inch+), bump to 200–300 amps—this ensures proper fusion for tig welding of aluminium.
- Tungsten electrode: Use pure tungsten (EWP) or zirconiated tungsten (EWZr), ground to a rounded tip. Sharp tips don’t work for AC, which is essential for alu tig welding.
Choose Gas and Filler
- Shielding gas: Pure argon (99.99%) is mandatory for tig welding aluminum. It protects the weld pool from air, preventing porous or brittle tig welded aluminum. Set flow rate to 15–25 cfh.
- Filler material: Pick tig welding wire matching your aluminum alloy (e.g., ER4043 for 6061 aluminum, ER5356 for strength). This ensures compatibility for tig welding for aluminium and strong welds.
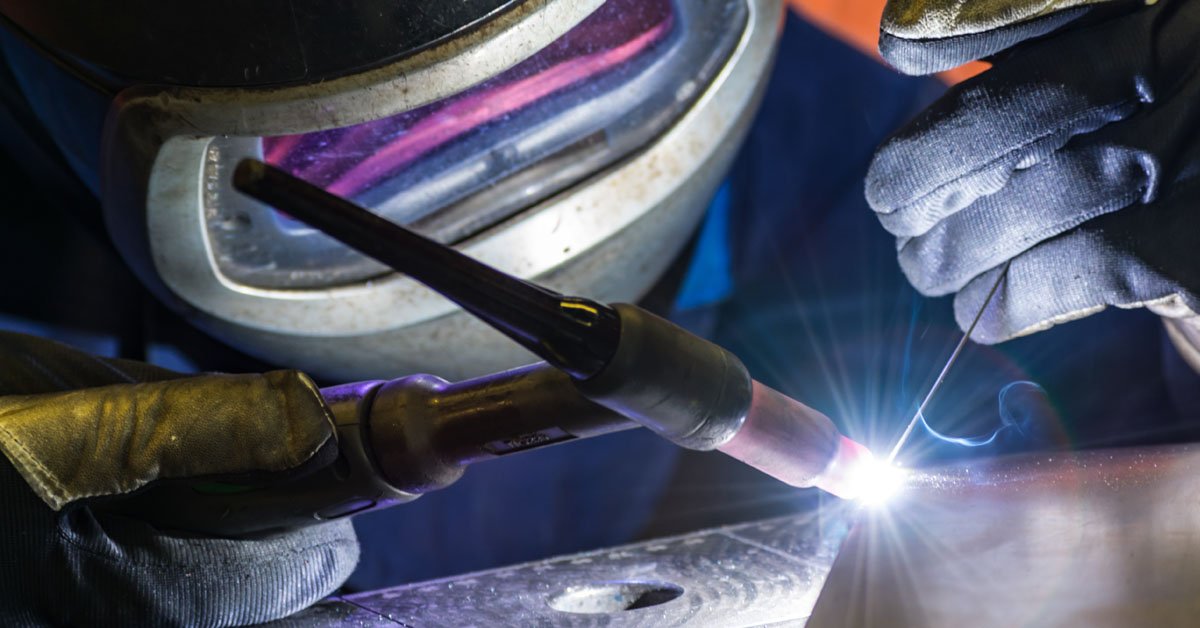
During Welding
Once your shielding gas and filler materials are set, you can begin the actual TIG welding aluminum process. Aluminum is highly heat-conductive and reacts quickly to temperature changes, so controlling heat input and travel speed is essential for consistent, high-quality results.
Start by setting your TIG welder to AC mode (alternating current). This current alternates between cleaning and penetration cycles — the positive phase removes the oxide layer, while the negative phase allows for deep fusion into the base metal. This balance is the foundation of smooth, clean aluminium welding with TIG. Adjust the AC balance on your machine to around 65–70% electrode negative for optimal performance and arc stability.
Before striking the arc, make sure your tungsten electrode is properly prepared. Use a slightly rounded tip rather than a sharp point, which helps create a stable arc during tig welding of aluminium. Maintain a short arc length, roughly 1–2 mm from the surface, and hold the torch at a 10–15° angle from vertical. This positioning keeps the heat directed into the joint and prevents overheating one side of the weld pool.
During alu TIG welding, focus on keeping your hand movements steady and consistent. Aluminum heats up rapidly, so if you stay in one spot too long, the material can quickly melt through or lose its shape. Move the torch smoothly along the joint at an even pace, maintaining a stable puddle. The arc should produce a soft humming sound rather than a harsh crackle — this indicates correct amperage and gas flow.
Feed the filler material — your TIG welding wire — carefully into the leading edge of the molten pool. Avoid touching the tungsten tip with the filler, as this can contaminate the electrode and destabilize the arc. Instead, develop a steady rhythm of dipping the filler into the puddle while moving the torch forward. This “dip and move” technique helps you form the signature rippled bead pattern typical of professional tig welded aluminum.
Keep an eye on your gas shielding throughout the weld. Aluminum is very sensitive to oxidation, so insufficient gas coverage can cause black soot or porous welds. Make sure the torch nozzle fully covers the weld pool and that the argon flow remains between 15–25 CFH. For larger parts, a gas lens can help achieve smoother gas distribution during tig aluminium welding.
As you approach the end of the weld, gradually reduce the amperage using your foot pedal or fingertip control. This slow taper prevents crater cracking, a common problem when you abruptly stop the arc during weld aluminum TIG. Once complete, allow the joint to cool naturally — forced cooling with air or water can cause internal stress or distortion.
By combining precise heat control, steady movement, proper gas shielding, and clean filler application, you can achieve bright, smooth, and strong joints through TIG welding for aluminium. With practice, this technique becomes second nature and produces high-quality welds ideal for applications such as CNC-machined aluminum parts, automotive components, and structural fabrications.
Post-Weld Care
Let tig welded aluminum cool naturally—quenching (rapid cooling) causes stress cracks. After cooling, brush away residual debris to finish your aluminium welding with tig project.
Key tip: Practice on scrap aluminum first to get a feel for heat input—this is the fastest way to improve your tig welding of aluminium skills. Always confirm your tig welder has AC capability, as it’s a must for any tig aluminium welding work.
Common Pitfalls & Best Practices
- Using DC instead of AC: If you try to tig weld aluminum with DC only, you lose the oxide-cleaning action and risk poor fusion.
- Poor joint preparation: Inadequate cleaning or fit-up leads to defects and rejects.
- Wrong filler: Using mismatched filler alloy for tig welding aluminium can reduce weld performance.
- Too much heat input: Aluminum’s high thermal conductivity means you can easily overheat and distort the piece, or result in a wide, shallow weld rather than a deep, narrow one.
- Insufficient shielding gas coverage: Contamination (from air or moisture) will cause porosity or oxide entrapment, undermining the quality of weld aluminum TIG.
TIG Welding FAQs
This guide organizes key TIG welding questions and answers for easy reference, with critical terms highlighted for quick identification.
1. What is lift TIG welding?
2. What gas is used for TIG welding?
– Argon-helium blends: Boost heat input for thicker aluminum.
– Argon with small hydrogen additions: Enhance weld bead appearance in stainless steel tig welding.Pure argon remains the most versatile option for most metals.
3. How hot to pre-heat aluminum for TIG welding?
– Thin aluminum (under 1/4 inch): No preheating needed.
– Medium thickness (1/4–1 inch): Preheat to 200–400°F (93–204°C).
– Thick aluminum (over 1 inch): Preheat to 400–600°F (204–316°C).After preheating, use a tig welder with proper amperage control and pair it with aluminum-specific tig welding wire.
4. How to TIG weld stainless steel?
1. Clean the stainless steel surface (remove oil, rust, debris) to prevent contamination.
2. Set your tig welder to 100–200 amps (adjust for material thickness) and use pure argon gas.
3. Use a tungsten electrode (2% thoriated or lanthanated) and matching stainless steel tig welding wire (e.g., ER308L for 304 stainless steel).
4. Maintain a short arc (1/8–1/4 inch) and move the torch steadily for a uniform bead.
5. Can you use argon for MIG and TIG welding?
– For tig welding: Pure argon works for most metals (aluminum, stainless steel, carbon steel).
– For MIG welding: Pure argon is only for non-ferrous metals (aluminum). For steel or stainless steel tig welding (MIG-style), use argon-CO₂ blends (e.g., 75% argon/25% CO₂) to improve penetration.Ensure your tig welder or MIG machine is compatible with the gas type.